


Source: Freepik
In this article in our mail security series, we will show you how to configure the forwarding of incoming mails. In our previous articles, we have informed you about the problems involved in sending mails, possible security vulnerabilities and security mechanisms that have already been implemented and explained why redirects are bad. This article is about setting up forwarding in the RWTH Mail App, also known as “OWA” (Outlook Web App).
Redirect or Forward – The Crucial Difference
The difference between forwarding and redirecting is that the mail header is retained in the case of redirection. In concrete terms, this means that the mail with the original sender is displayed in the target mailbox. This can lead to problems when receiving the mail. With forwarding, however, the mail header, i.e. the header line of an mail, is technically rewritten. This means that the receiving mailbox can no longer read the original sender’s information from the mail header. This has the advantage that the mail is not rejected because the RWTH mail address is not sent in the name of “Gmail”, for example. In addition, the mail is not accidentally classified as spam and is therefore reliably delivered.
In general, we recommend switching off redirects in IdM Selfservice and, if necessary, setting forwarding rules. Ideally, however, mails are read in the correct mailbox. Modern mail clients offer you the option of displaying all your incoming mails from different mail addresses in one folder.
Configure Forwarding Rule
Would you like to configure a forwarding rule for your @rwth e-mail address forwarding, i.e. an inbox rule (e.g. in OWA) for your @rwth e-mail address so that incoming mails are sent to a specific mail address? With such a configuration, an @rwth-aachen.de address is entered as the sender address and the mails are accepted because the mail header is rewritten. You can configure your forwarding rule for the OWA as follows:
- Click on the gear wheel at the top right
- Select “Options”
- Click on “Inbox and sweep rules” in the page list on the left below „mail”
- Then select the plus sign “+” under “Inbox rules”
Source: Own illustration
This allows you to define your personal inbox rules and specify the mail address to which a message should be forwarded. Define a name for your inbox rule and specify certain conditions that must be met. For example, if an email is received from a certain person or organization and should be forwarded, you can select “It was sent or received” as a condition and differentiate between “Received from” or “Sent to”.
You will then be forwarded to your contacts. Select an e-mail address that is in your contacts and then double-click on the respective entry or alternatively add an e-mail address. This is possible in the line at the top under “It was received from…”, see figure two.

Source: Own illustration
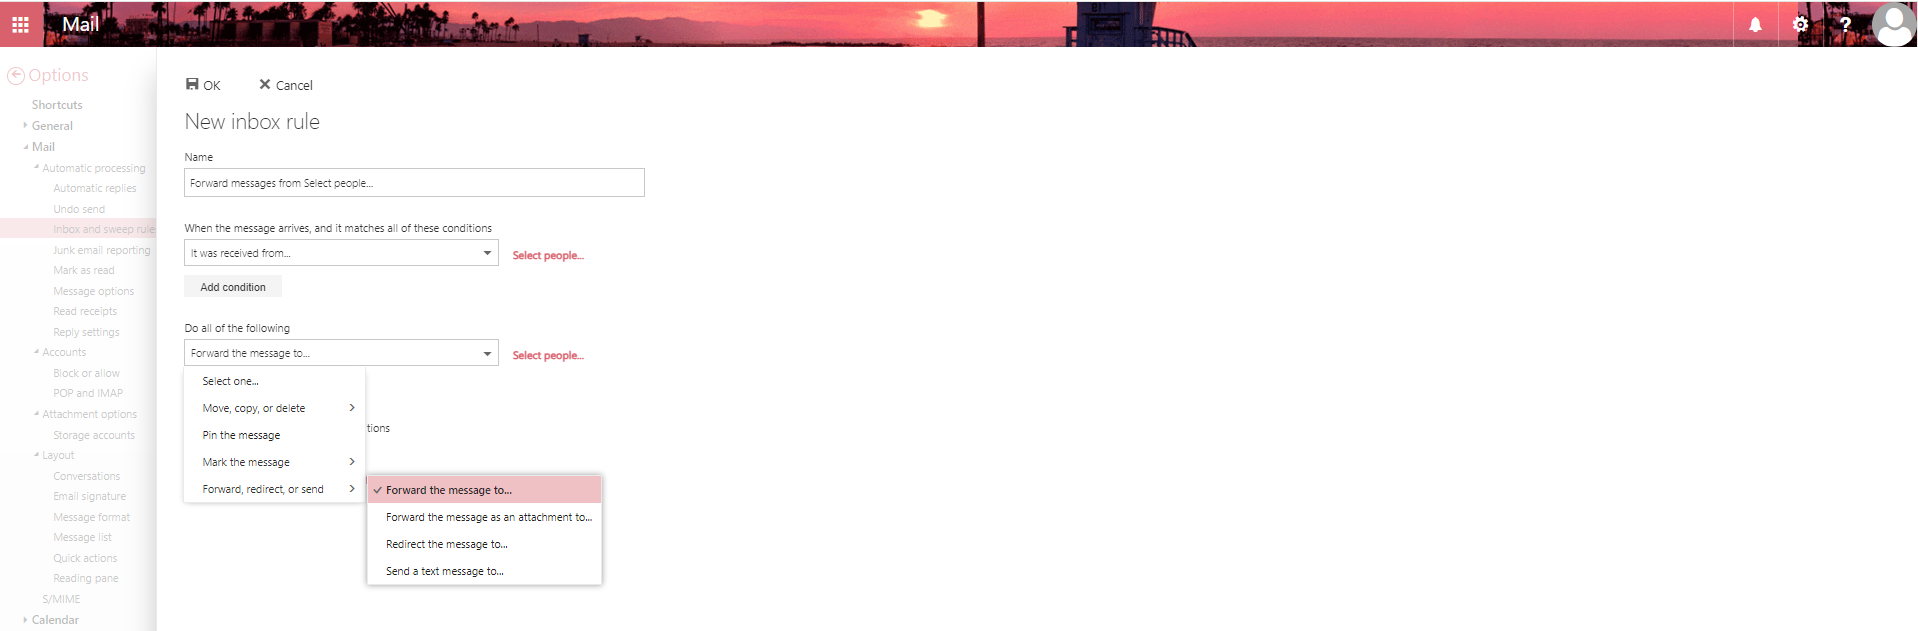
Now select one of the following actions, such as “Forward, redirect or send”. In this step, you will also be redirected to your contacts to enter the desired mail address for forwarding. At the end of the configuration, it is important that all the settings you have made are saved carefully.
Please note that forwarding rules can only be set up after the redirects have been issued or removed in IdM Selfservice.
Questions?
Is something still unclear? You can find step-by-step instructions for OWA filter rules on IT Center Help.
Responsible for the content of this article are Lina-Louise Kaulbach, Morgane Overath and Thomas Pätzold.


Danke. Wäre vielleicht nicht schlecht, diese Art von Infos auch direkt an der Stelle zu verlinken, wo man die Einstellungen treffen kann (in diesem Fall bei den Weiterleitungs-Einstellungen im IdM Selfservice).
Hallo Peter,
vielen Dank für deinen Kommentar. Bitte beachte, dass es sich hierbei um Einstellungsmöglichkeiten in der Outlook Web App handelt. Daher macht eine Verlinkung im IdM Selfservice an dieser Stelle keinen Sinn.
Solltest du Anleitungen suchen, schau gerne auf IT Center Help vorbei:
https://help.itc.rwth-aachen.de/
Viele Grüße
das IT Center Blog Team